Follow me

WINGED LINER

Leave a Comment
Hiya petals

This blog post will be about my liquid/gel/pen/clay liners I own.

  • Tarte's tarteist clay paint liner in black
  • Maybelline New York's master ink in 10 Charcoal black matte
  • Anastasia Beverly Hills waterproof crème color in jet
  • Morphe Brushes gel liner in naked
  • Loréal paris superviser perfect slim in intense black
  • Benefit they'r real push-up liner


Tarte- tarteist clay paint liner in black rrp:£19.00

My go to product for getting that perfect winged eyeliner is a mix of the tarte artist clay paint liner with the maybelline new york master ink liner in no 10 charcoal black. I usually first of all go in with the tarte artist clay paint liner and using the tarte etch and sketch double ended bamboo liner brush, which I must say is my fave ever eyeliner brush, line my eyelid. This brush has to be the most precise brush out there in opinion as one side is angled to get that perfect angled wing and the other side is straight to get that perfect arch around your eyelid. I then usually sometimes go in with the maybelline master ink to get the super matte winged eye look. To line my waterline, I usually go in with the Tarte liner as I love how the formula of the clay does not shift from my waterline and stays put for a long period of time without smudging. 

Where to purchase?

Purchase brush from: http://www.sephora.com/etch-sketch-double-ended-bamboo-liner-brush-P392013
Purchase from; http://tartecosmetics.com/tarte-item-tarteist-clay-paint-liner

  • http://www.sephora.com/tarteist-clay-paint-liner-P392636?skuId=1673748&icid2=products%20grid:p392636

  • Maybelline New York- master ink 10 Charcoal black matte rrp:£4.99

    My favourite drugstore liquid eyeliner has to be by far the Maybelline New York's master ink in 10 Charcoal black matte as the precision of the applicator is so thin and flexible it makes it easier to work with, giving you that knife cutting sharp wing. The pigmentation and the way it dries completely matte makes it worth every single penny you pay. I feel as though out of all these products I have mentioned, this product is the easiest/quickest one to use. If you do not like a matte finish, Maybelline do a satin finish in the same packaging.

    Where to purchase?

    Anastasia Beverly Hills- Waterproof crème color jet rrp:£18.00

    I've only recently tried the Anastasia Beverly Hills waterproof crème color in jet and I must say I am absoutelty in love with the creaminess of the product and the pigmentation. I usually go in with my Zoeva- 117 wing liner when using this product to not only create a wing on my eyelid but also to outline my waterline as this product does not smudge and I feel as though it's much better and longer lasting than pencil liners on the waterline.

    Where to purchase? 

    Purchase crème color from;

    Morphe Brushes- gel liner in naked rrp:£7.25

    So I wanted to try the Morphe gel liner in black slate but it was out of stock everywhere so I decided to try the shade "naked" which is a beautiful chocolatey brown matte shade. The formula of this product is the best. It is so creamy and applies like butter which I love as it makes it easy to draw that wing. If I want to go for a natural look, I'll use this gel liner with my Zoeva- 117 wing liner brushes for my wing, as the brown isn't too overpowering on my eyelids. I also love using this gel liner when creating cut crease looks as it is so creamy, it makes it easy to blend out however you must blend the product pretty quick as it drys fast.

    Where to purchase?

    Loréal Paris- super liner perfect slim rrp:£6.99

    This has to be my fave drugstore pen liner when it comes to marking my wing as the nip of the pen is 0.4mm giving me perfect precision to create not only a thin wing but also a thick wing. The product is similar to the size of a pen, making it easier to grip hold and create that wing. I love the intensity of this product and if you want to go for a colourful wing, Loréal Paris has released coloured super liners as well as different shades of black so if you want a less intense black, there are more subtle black liners just for you.

    Where to purchase?

    I believed this product would have been amazing as I love Benefits brow and mascara products however this product just did not work for me no matter how much I tried to work with it. The product comes out all thick and flakey and smudges a lot on my fingers. I'm not sure if it's just the one I ordered but I have read some reviews where people have agreed with me too. Since it was pricey, I twist the product out onto a palette, add a bit of face oil to make it less crumbly and use one of my eye liner brushes to apply the product just because I don't want to waste £18.50. On the upside, the product gives a beautiful intense black colour. Just such a shame how the product does not come out nicely and smoothly out of the nip as it is said that the nip is made to be flexible to give you that perfect precision to create your wing. That being said and done, some people love the product and believe it does everything it says it does, so feel free to splash out and try the product if you want.

    Where to purchase?

    SHARE:
    0 comments

    bourjois rouge edition velvet lipsticks

    Leave a Comment
    Hiya petals

    This post will be about the three shades; 3 hot pepper, 7 nude-ist and 10 don't pink of it, out of the Bourjois rouge edition velvet lipsticks. These lipsticks have a very light weight, creamy formula, which makes them feel extremely comfortable to wear on the lips. They apply on the lips very velvety and creamy, but they dry completely matte on the lips and it honestly doesn't feel like you are wearing anything on your lips. This product has a slight smell to it so some may be put off the smell however the smell does not really bother me.


    They come in a cute travel size friendly clear tube with a doe foot applicator which I love as I feel as though this applicator makes it easier to apply the product neatly on to the lips instead of having to use a lip brush. 

    Here are the swatches of the three lipsticks so you can see the true colour and what is looks like on my skin tone. I am tamil so my skin is in the medium to dark range so I have done hand swatches as well as lip swatches.

    From top to bottom 

    • 7 nudist (beautiful pinky brown nude)
    • 10 don't pink of it (deeper pinky mauve nude)
    • 3 hot pepper (an elegant orangey red shade)
    I have paired each lipstick with a lip liner just because sometimes I feel like I want to darken some of the shades up.  Therefore if you feel like the shades are a little to light for your skin tone, feel free to pair up some of the lip liners listed below with the lipstick to get that perfect shade for you or if the colour is correct for you stick to just the lipstick.
    "Huda beauty lip contour" in the shade "Cheerleader" all over the lips and then "Bourjois rouge edition velvet lipstick" in "3 hot pepper" for a beautiful vibrant red.

    "bareMinerals marvellous moxie" in "Revved" all over the lips and then "Bourjois rouge edition velvet lipstick" in "7 nudist" for a beautiful pink nude.

    "Mac lip liner" in "Soar" all over the lips then "Bourjois rouge edition velvet lipstick" in "10 don't pink of it" for the perfect mauve pink shade.

    PROS

    • Feels like there is nothing on your lips
    • Dries matte
    • Creamy, velvety feel when applying
    • Doe foot applicator is small enough to get good enough precision
    • Travel friendly
    • Clear packaging

    CONS

    • Has a slight smell to it which some people might be put off
    • A little too drying on the lips after a while

    How to use


    1. First of all, after moisturising my face, I like to go in with my all time fave lip balm at the moment which is the Nuxe paris rêve de miel. 
    2. Apply the rest of my face/eye makeup. 
    3. Take off my lip balm and use a hot towel to rub against my lips to get rid off any dry skin.
    4.  Colour correct my hyper-pigmentation round the corner of my mouth, using the orange colour in my "Anastasia Beverly Hills cream contour palette" in the shade, medium to dark and I use my fingers to do this. I like to apply a thin layer of this orange shade to just colour correct the areas where I can see darker patches
    5. Apply a little bit of the "Urban Decay naked skin concealer" in the shade medium-dark warm on top, and to blend this baby out I use my nude beauty blender by using dabbing motions to prevent the orange shade from moving around.
    6. Then I usually line my lips with a lip liner which will go perfectly with whatever shade lipstick I'm using.
    7. Finally go in with the lipstick and fill in the gaps. If it's hard to get precision with the doe foot applicator, I will go in with a lip brush. 

    Where to purchase the product? rrp: £8.99


    SHARE:
    0 comments

    high-end highlighters

    2 comments
    Hiya petals

    This blog post is the second part of my highlighters/illuminator so if you are after a drugstore highlighter, I suggest you read "
    highlight pt 1" http://thetamilbeauty.blogspot.co.uk/2016/03/makeup-revolution-highlighters.html as this post is on high-end highlighters.

    Clinique- chubby stick sculpting 01 heffty highlight rrp:£19.00


    Now this is a cream, oil free product which comes in a stick so you can use a brush to apply this product or you can go in with the stick itself or even with your fingers, and apply it on the areas you highlight. I usually go for my "Under cover" brush from Spectrum Collections which is a baby buffer brush.
    This has to be far the most subtle highlighter I own, so if you're the type of person who doesn't want to go for an "in your face" glow, then this is the perfect product. I use this on days where I just want a beautiful, natural glow as it has a pretty pale pink colour with a gorgeous, natural glow. 

    Pros

    • Colour is buildable
    • Can be used under other highlighters or on top
    • Subtle glow so gives a more natural look
    • Creamy feel
    • Blends easily into the skin
    • Small enough to carry in your makeup bag
    • Contains a lot of product

    Where to purchase?

    Anastasia Beverly hills illuminator- Riveria rrp:£28.00


    An illuminator helps to give you a brighter appearance to your face and gives you a warm, radiant glow.
    This has to be my favourite powder illuminator I've ever tried. I feel as though this is a rose gold colour with silver highlights which suits my skin tone the best out of all the other powder highlighters I have mentioned. Sadly my nail dug into the pan so my illuminator doesn't look as amazing as it did. 
    If you are not after a champagne pink golden illuminator, then I recommend you check out "peach nectar" "starlight" or "so hollywood" by Anastasia Beverly hills or even their new glow kits.
    I will list my brushes I use for this product down below and how I apply my highlight if you are interested. 


    Pros

    • Pigmented so only a little is needed
    • Gives a more natural glow
    • Blends effortlessly
    • Creamy feel
    • Doesn't have a powdery pick up
    • Compact mirror
    • Sturdy packaging
    • Contains a lot of product

    Where to purchase? 

    Perricone MD no highlighter, highlighter rrp: £29.00


    I purchased this product over a month ago and I must say I love this highlighter. It is my first ever liquid highlighter and I just love the consistency of the formula and the blendability.
    This product comes in a cute little bottle with a doe foot applicator. So you shake the bottle then twist the cap and apply about 2-3 dots on the tops of your cheek bones, down the bridge of your nose, on your brow bone and cupids bow. Then using your finger, you can blend the product in. I love how this product looks on my skin as it has a soft pearlized effect with pink/ yellow undertones to it so it really compliments my skin very well. 

    Pros

    • Lightweight on the skin
    • Vitamin C Ester to help brighten, firm and smooth the appearance of the skin
    • Gives a beautiful natural glow
    • Blends effortlessly 
    • Buildable
    • Creamy feel
    • Small enough to carry in your makeup bag

    Where to purchase

    Swatches

    HOW TO APPLY HIGHLIGHT?


    I love to go in with my real techniques setting brush to apply either of the makeup revolution highlighters onto the tops of my cheek bones, down the bridge of my nose and on my brow bone. Sometime if I want to go for a more subtle glow, I will use my morphe M134 brush to apply the highlight down my nose and on my brow bone as the brush is the perfect size for these areas. You can highlight on your cupids bow however I choose not to because I have a prominent cupids bow so I do not want to add anymore attraction towards it. 
    I use sweeping motions to apply my highlighter so the product can be distributed evenly onto my skin. If I want a more intense highlight, I will dab the product onto my skin then use sweeping motions to blend the highlight out. I will go in with my Spectrum Collection's No 1 fan brush to blend my highlight out and I love this brush because the fanned bristles really help sweep the product seamlessly onto the skin.

    Where to purchase the real techniques setting brush? rrp:£5.27

    SHARE:
    2 comments

    makeup revolution highlighters highlight pt 1

    2 comments
    Hiya petals

    Who doesn't love to look like a glowing angel?
    So originally this post was going to be about all my favourite highlighters however I felt as though the blog post was too long so I decided to spilt this post into my favourite high end highlighters and drug store highlighters. So this post will be on the makeup revolution highlighters which I love.


    Makeup Revolution highlighting powder palette- highlight rrp: £8.00

    This highlight palette contains three shades, all suitable for a range of skin tones. Theres golden lights, peach lights and pink lights in a black palette with a big mirror which I find very useful. 

    Now I have seen a lot of people say that this highlight palette is the perfect dupe for the hourglass infamous ambient lighting powders but I wouldn't be able to justify this because I do not own the hourglass lighting powders but I do believe for £8.00 this palette is worth it if you want a shimmery glow. If you do not want all three shades, makeup revolution sells each of these shades separately.

    Pros

    • Super pigmented so only a little is needed
    • Creamy feel
    • Finely milled
    • Doesn't have a powdery pick up
    • Colour is buildable
    • More shimmery than glittery
    • Mirror included
    • Three shades
    • Sturdy packaging 

    Where to purchase?

    Makeup Revolution vivid baked highlighter- peach lights rrp: £3.00

    This is a cool toned pink with a slight metallic/silvery shimmer. Out of all the highlighters, I think this gives the most subtle colour on the cheekbones which I love. The product is finely milled so you do not find yourself with a massive patch of glitter which makes the Makeup Revolution highlighters one of my favourite drugstore highlighters.

    Pros

    • Creamy feel 
    • Finely milled
    • Doesn't have a powdery pick up
    • Colour is buildable
    • More shimmery than glittery (my personal preference)
    • Packaging contains a lot of product
    • Clear lid to see the colour of the product
    • Sturdy packaging
    • Cheap only cost £3.00

    Where to purchase?

    From the top to the bottom
    • Peach lights
    • Pink lights
    • Golden lights

    How to apply highlight?


    I love to go in with my real techniques setting brush to apply either of the makeup revolution highlighters onto the tops of my cheek bones, down the bridge of my nose and on my brow bone. Sometime if I want to go for a more subtle glow, I will use my morphe M134 brush to apply the highlight down my nose and on my brow bone as the brush is the perfect size for these areas. You can highlight on your cupids bow however I choose not to because I have a prominent cupids bow so I do not want to add anymore attraction towards it. 
    I use sweeping motions to apply my highlighter so the product can be distributed evenly onto my skin. If I want a more intense highlight, I will dab the product onto my skin then use sweeping motions to blend the highlight out. I will go in with my Spectrum Collection's No 1 fan brush to blend my highlight out and I love this brush because the fanned bristles really help sweep the product seamlessly onto the skin.
    If you have any suggestions on good highlighting brushes, feel free to leave a comment in the comment section.


    Where to purchase the real techniques setting brush? rrp:£5.27

    Where to purchase the spectrum collections No 1 fan brush? rrp: £9.99

    Where to purchase the spectrum collections feeling fancy brush rrp: £4.99? aka (smaller than the No 1 fan brush)

    Where to purchase the morphe M134 rrp:£1.99


    SHARE:
    2 comments

    brows

    5 comments
    Hiya petals


    When it comes to brows, I have two favourite high end brow products I like to use separately or together depending on my mood and yes once again, they are from the brow goddess: Anastasia Beverly Hills 
    I have also included two drug store products I like to use as I believe they are pretty good for the price you pay.

    My brows

    Here is one of my brows using the dip brow pomade in ebony with a mixture of the brow definer in medium brown. I get my eyebrows threaded and I usually use a pair of tweezers to try and keep them in shape by pluck the odd hairs.

    Dip brow pomade -ebony rrp; £15.00


    The dip brow is super creamy, waterproof, long-lasting and buildable so you have the option to go for a more natural brow or more defined brow with this product. I use the Anastasia Beverly Hills dip brow in the shade ebony however I will probably purchase a lighter shade next time just because I feel like this shade makes my eyebrows look a bit too thick as I have quiet a bit of eyebrow hairs already. 
    Purchase from; http://www.anastasiabeverlyhills.com/brows/dipbrow-pomade-waterproof-color-brow-sculp.html
    https://www.cultbeauty.co.uk/anastasia-beverly-hills-dipbrow-pomade.html
    http://www.beautybay.com/cosmetics/anastasiabeverlyhills/dipbrowpomade/

    I either use my zoeva rose golden 332 brow line brush and my Ardell brow duo brush to apply my dip brow onto my brows.
    https://www.zoeva-shop.de/322-brow-line/a-8000365/
    http://www.eyelashwishes.co.uk/ardell-duo-brow-brush.html?gclid=Cj0KEQjwiKS3BRCU-7XQ75Te3NoBEiQAA2t_xLS1Mbt7ceJy1oZi99796LjOKAh8-Py_f9MGbraItk8aArUn8P8HAQ


    Brow definer -medium brown rrp;£16.00

    The brow definer is my favourite EVER brow pencil created. I purchased this in the shade medium brown and I love how this shade makes my brows look natural when I fill them in. The reason why I choose this product over any other brow pencils is because of the triangular tip which means you can turn this product three different ways to use to create different strokes. This product also comes with a spooly on the other end of the pencil which is very handy.
    • "Use the tip when wanting to create fine, hair like strokes.
    • Use the back side of the pencil when wanting to create thicker hair-like strokes.
    • Use the pencil on the side to create broad strokes."

    Rimmel London professional eyebrow pencil -004 black brown rrp; £2.99

    This product is long wearing and the colour suits my eyebrow shade as my natural eyebrow hairs are dark, however I dislike the brush that comes on the cap/lid. It is really dense and the bristles feel horrible when combing through my brow hairs therefore I end up using my own spooly. 

    Maybelline brow satin -dark brown -£5.99

    This has to be my favourite drug store brow product just because I love the mechanical pencil packaging as well as how this product applies to my brows. The colour is buildable and I love how my dark eyebrow hairs blend well with this product.

    L'oreal brow artist plumper- £5.99

    This is my all time favourite brow setting product. It literally keeps my brow hairs put forever and I love how the spooly applicator is small so it can be used for people who have thin eyebrows. It has a slight tint but not too much to make your brows look to exaggerated and only enough of the product gets picked up on the spooly brush. Purchase from;

    Feel free to use clear mascaras or even spray a bit of hair spray on a spooly brush to set your brows if you do not want to splurge money on a brow setting product. Both these tricks do exactly what most brow setting products do. 


    How to use brow pomades

    First of all, I brush out my brows and tweeze any hairs that need tweezing. Then using a flat angled brush to apply the product onto my eyebrows, I start from the bottom of my brow and follow my arch outwards and fill in my sparse areas. I then use the spooly to evenly blend the product out. To clean up my brows, I use a concealer lighter than my skin shade to define my brow bone.

    Step by step brow routine by the beautiful https://www.instagram.com/elymarino/
    If you would like to see a photo of my brows, feel free to leave a comment and I will happily do so, thank you x
    SHARE:
    5 comments

    my fave contour kits

    Leave a Comment
    Hiya petals

    This blog post will be on my two favourite high-end contour kits and yes they are slightly pricey however they do the job. These two kits seem to be my holy grail when it comes to contouring just because I love the blendability of the products as well as the various shades in both of these kits and YAS you guessed right, it's everyones favourite: Anastasia Beverly Hills contour kits. 
    PROS
    • Creamy
    • Blendable
    • Various Shades
    • Refill pans so it is cheaper instead of buying a complete new palette when one pan is finished
    • Highlighting and contour shades available
    • Packaging is beautiful 
    • Perfect for Tamil (brown) skin tones as the products are dark enough to show on the skin 
    • Buildadble for your skin preference
    • Fool proof


    Powder contour kit from Anastasia Beverly Hills (Medium to Tan)


    This is my favourite powder contour kit and I use this in the medium to tan palette because I don't want an extreme dark contour. I just want a contour kit which is going to enhance my facial structure as my cheek bones and jawline are pretty prominent.


    Shades -(from the top line to the bottom line)

    • 10k -(highlight shade)
    • Macchiato -(highlight shade)
    • Havanna -(contour shade)
    • Nutmeg -(contour shade)
    • Espresso -(contour shade)
    • Peaches & cream -(contour shade)
    Now I like to contour my cheek bones and nose with the shade Espresso mixed with a bit of Havanna to give me that beautiful greyish brown undertone to create that shadow.
    If I need to set my under eye concealer, I will go in with a tiny bit of peaches & cream mixed with Macchiato to brighten my under eyes slightly. This step is optional depending on whether I am wearing cream products or not. 
    I use 10k to highlight the top of my cheekbones, under my brow bone as well as the bridge of my nose and I avoid highlighting my cupids bow just because I have a prominent cupids bow.

    Brushes

    I use an angled fluffy eye brush to apply my powder contour shades onto my skin because I like to use minimal amount of product then to blend out the product. To blend the contour shades I use the baby buffer brush and the flat top buffer brush in circular motions because they are dense therefore give you a more natural sculpt which is what I love.

    Now the brushes I like to use are from a company called Spectrum Collections and I love their brushes not only because they are super cute but I also love how easy they make blending and application etc. 

    If I am in a rush, however I do want to contour, I will usually use my powder contour kit just because I believe you can work quicker with this palette however if I am using my cream kit I like to use this powder kit to set my contour in place.


    Cream contour kit from Anastasia Beverly Hills (Medium)

    Shades -(from the top line to the bottom line)


    • Cream -(brighten under eye shade)
    • Banana -(cancels out the purple/blue veins and evens out skin tone)
    • Warm coral -(cancel outs darkness around the eye and brightens around the eye)
    • Cinnamon -(contour shade)
    • Chocolate -(contour shade)
    • Ash Brown -(contour shade)
    If I want to go full on out, I will use the warm coral shade to cancel out my dark circles around my eyes and then I apply the Banana shade on top to cover up my veins around my eye. Then I go in with Cream or another concealer to brighten my under eye. 
    For contouring, I use a mixture of Cinnamon and Chocolate to contour my cheek bones, forehead and nose.

    Brushes


    I use a concealer brush to apply the cream products on to my face, then using my flat top buffer brush, I like the blend upwards towards my cheekbones to blend the product. After this I spray a few spritz of my Urban Decay makeup setting spray onto my Real Techniques miracle complexion sponge which I dab onto my skin to blend the cream product to give me a natural sculpt. I will use the powder contour kit to set everything in place and I usually use the bigger buffer brush to blend everything out.

    Purchase products

    Purchase both the cream and powder contour kits from; http://www.anastasiabeverlyhills.com/makeup/face.html 
    rrp: £39.00

    Purchase Spectrum Collection brushes from their website: 
    rrp: varies from £3.99-£9.99 or sets from £29.99- £99.99

    Purchase the Urban Decay setting spray from; 
    rrp: £9.00 for travel size or £22.00

    Purchase the Real Techniques miracle complexion from Superdrugs or Boots online or in store
    rrp: £5.99

    I hope this helps anyone who wants to try out contouring or maybe is after a new contour palette. I will later on make a video on how I contour as it might be easier to follow but in the mean time feel free to leave any comments down below if you'd like more help or anything.
    SHARE:
    0 comments

    my fave drugstore to high-end lip liners

    Leave a Comment
    Hiya petals x


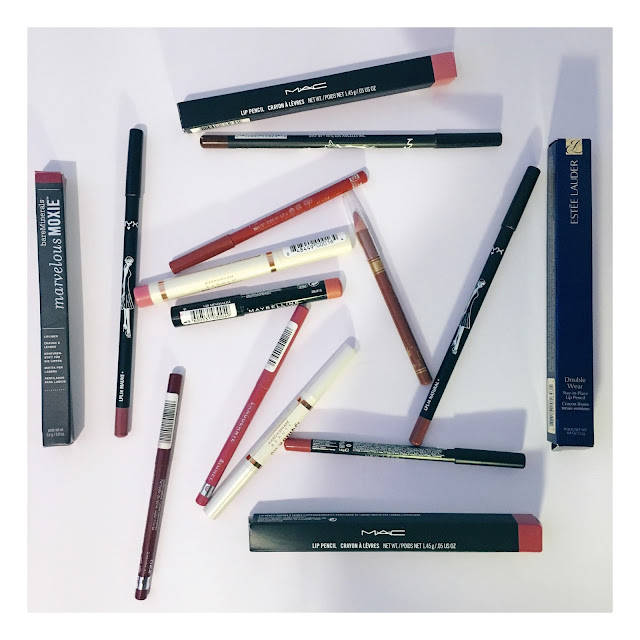
    As you can see from the photo above, this post will be on my fave drug store to high-end lip liners. Lip liners are my holy grail just because I believe they complete a lip look and they make your lipstick stay put longer and who could not want that??

    Now normally I don't really purchase high end lip liners as I believe there are many drugstore lip liners that do the trick therefore you're better of saving money on drugstore products, however the high end lip liners I own are incredible.

    My personal preference when it comes to lip products are the mauve pinks, brownie pinks therefore in this post, the colours will mainly be them colours. I hardly wear dark colours just because I don't feel like I can pull them off however that does not mean to say dark colours don't suit our skin tone or you cannot pull them off.

    I love to wear these lip liners with all different kinds of lipstick just to get that perfect colour for me so feel free to mix and match any lip liners with any lipstick or you can use most of these lip liners as they are on the lips and just fill your lips with them. 

    Here are some swatches of each lip liner to see the true colour and what it looks like on my skin tone. Now I am tamil so my skin is in the medium to dark range so these are how the shades look on my skin tone. 

     From top to bottom 
    I have listed the lip liner brands, colour, cost and a link per lip liner so you guys can purchase these products however feel free to look around other websites if you'd rather save some pennies.
    1. Estée Lauder double wear stay in place Lip pencil- Mauve rrp: £17.50. I usually wear the Estée Lauder lip pencil on its own just because it is super creamy and I love how the colour looks on my lips. It is slightly on the pricey side however money well spent because this is my fave lip liner so if you want to splash some cash, I recommend you purchase this beauty. http://www.esteelauder.co.uk/product/648/6509/Product-Catalog/Makeup/Lips/Lip-Pencils/Double-Wear/Stay-in-Place-Lip-Pencil
    2. Bare minerals marvellous moxie- Revved rpp: £13.00. Another favourite one of mine. Super creamy as well and I just love the formula. Similar colour to the Estée Lauder but a bit more towards the brown side. http://www.bareminerals.co.uk/Marvelous-Moxie-Lipliner/UKMasterMoxieLipliner,en_GB,pd.html
    3. Mac lip pencil- Edge to edge rrp: £12.50 Super pretty pinky shade which I love to mix with other lipsticks to give more of a pinky tone. One of my favourite pink lip liners. http://www.maccosmetics.co.uk/product/shaded/167/340/Products/Lips/Lip-Pencil/Lip-Pencil/index.tmpl 
    4. Mac lip pencil- Soar rrp: £12.50 Another favourite of mine. Love to wear this on it's own as well as mix it with other lip colours. http://www.maccosmetics.co.uk/product/shaded/167/340/Products/Lips/Lip-Pencil/Lip-Pencil/index.tmpl 
    5. NYX- Natural rrp: £3.50 Beautiful nude lip liner perfect for nude lipsticks or to bring darker colours http://nyxcosmetics.co.uk 
    6. NYX- Expresso rrp: £2.95 Perfect brown to give you that true brown lip colour with a brown lipstick http://www.thebeautystore.co.uk/make-up-c163/lips-c173/lip-liners-lip-pencils-c211/nyx-cosmetics-long-lip-pencil-lpl11-expresso-2g-p3585
    7. NYX- Mauve rrp: £3.50 Another beautiful mauve pink colour. Perfect alone or paired with a pink nude or a brown nude.
    8. http://nyxcosmetics.co.uk
    9. Maybelline colour drama- 140 minimalist rrp: £4.99  Usually mix this with brown nude just because I believe this is a little too light for my lips but has a gorgeous shimmery look to it. http://www.superdrug.com/Maybelline/Maybelline-Color-Show-Lipstick-140-Minimalist/p/252534
    10. Rimmel exaggerate- 064 obsession rrp: £3.99 Super creamy, burgundy colour however not too pigmented which I like just because I usually add a pink to this to give me a perfect pink shade. http://www.superdrug.com/Rimmel/Rimmel-Exaggerate-Lipliner-Obsession-64/p/698886
    11. Rimmel exaggerate- 063 eastend snob rrp: £3.99  Beautiful cooled tone pink which I am obsessed with and love love love the formula of this however I do mix this with other colours just because it is a bit too light for my skin. http://www.superdrug.com/Rimmel/Rimmel-Exaggerate-Lipliner-Eastend-Snob-63/p/933473
    12. Rimmel lasting finish- 011 spice rrp: £2.99 Brownie pink shade however can be more brown if you apply more of the product so you can use this to your liking. http://www.boots.com/en/Rimmel-1000-Kisses-Lipliner_1113541/
    13. Barry M lip liner-5 rrp: £2.99 Light brown/nude shade however I like to mix this with other lipsticks than wear it alone. https://www.barrym.com/product/Lip-Liner
    14. New look- pure colour lip pencil dark pink- rrp: £1.99 A little too light for my skin however love to mix this colour with a nude to give a hint of pink and it's really creamy. http://www.newlook.com/shop/womens/beauty/pure-colour-dark-pink-lip-liner-_325185675
    If you would like to see lip swatches for these lip liners, leave a comment below in the comment section and I will be happy to do so.
    SHARE:
    0 comments

    tartelette in bloom

    7 comments

    Hiya petals

    This review will be on the tartelette in bloom eyeshadow palette which is CRUELTY FREE WOOOOOO so if you're interested in purchasing this product or you're after a neutral palette with the option of vamping the day time look to a more smokey eye look, then keep reading.


    So here is the gorgeous tartelette in bloom clay palette and as you can see the colours are to die for which has that divine smell that the too faced chocolate bar palette has. You have a range of neutral shades and some luster finishes as well as the dark crease colours for that beautiful smokey eye. The colours are buildable therefore suit most skin types especially medium to dark skin tones which is a huge bonus for me as I feel certain palettes are not that pigmented therefore don't show up that well on my skin tone. 

    The colours are pre cordinated to give you that perfect eyeshadow combinations. For example, the top row, vertically from charmer to smokeshow, the shadows can be used together to create an everyday look with the neutral to grey colours or you can switch up the colours to create a day time look into a night time look by using the luster finish with a dark matte crease.


    From left to right

    1. Charmer -Matte 
    2. Flower child -Matte
    3. Funny girl -Luster (pack on top of matte shades perhaps to add some glitter)
    4. Jetsetter -Matte
    5. Smarty pants -Matte (perfect base colour because similar colour to my skin shade therefore it's not showing up too well on my skin)
    6. Sweetheart -Matte (perfect base colour but has more of a pink undertone)
    7. Rocker -Luster
    8. Firecracker -Luster
    9. Rebel -Matte
    10. Smokeshow -Matte
    11. Activist -Matte
    12. Leader -Matte

    The amazonian clay formulas of each of the eyeshadows are incredible as they are not chalky therefore easily blendable and stays put for hours on end as well as the colours being easily built up to get that pigmented colour you want. The palette is so versatile as the colours can be used wet to use as a liner colour or as a highlight for the brow bone.

    The packaging is super classy with the gold and in my opinion, packaging that is gold, is just everything. The palette opens up with the shadows as well as a mirror which I find very handy. If you purchase the product from qvc, you also receive the rule bender double-ended eyeshadow brush with the palette which is bent for  you to perfectly contour round the eyes.

    I  am 100% in love with this palette and is probably one of my go to eyeshadow palettes at the moment therefore highly recommend this product for anyone who is stuck for birthday ideas for a lover, best friend, family member or even just a treat for yourself. 

    Where to purchase this?
    Hope these links are helpful for you if you're after this product. 
    SHARE:
    7 comments
    Next PostNewer Posts Home

    Newsletter

    Subscribe Our Newsletter

    Enter your email address below to subscribe to our newsletter.

    BLOG TEMPLATE CREATED BY pipdig